


Water Damage Series – Part 4: Classes
Every water loss has a class. No, not a class in school, and it’s not middle-class or anything like that, but a classification. We’ve already talked about categorizing every water loss based on the level of contamination. It is a very helpful tool for making sure the right strategy is employed for cleaning. But what this classification does is help the water technician develop a drying plan. This means determining what drying equipment is needed based on how much area is affected and how much water has been absorbed by the building materials.
How Wet is It?
It sounds like the setup to a punchline:
“My house is so wet…”
“How wet is it?”
Well, there is no punchline. Its an important question a water technician needs to ask when planning out the drying strategy. And there are other important questions that need to be answered. Let’s look at the questions:
- What is wet?
- How wet is it?
- When will I know when it is done drying?
What Is Wet?
The question isn’t asking about if it’s your home or business, but what kind of materials. Do you have carpet? Is the sub-floor wet? What about baseboards, insulation, wall studs, Sheetrock in the wall or ceiling?
The type of material, along with how wet that material is, will make a difference in how the technician will classify the loss. Some things are easier to dry than others. If you spill a glass of milk on the table, you can wipe it up immediately and your table dries right up. But if you have a linen tablecloth over the table and spill that milk, you can wipe it up right away, but the tablecloth will still be wet. Additionally, the table underneath the wet tablecloth will still be wet.
The same thing will apply to your home. When your water heater bursts and floods the hallway, all the carpet is wet, the carpet pad beneath it is wet, and the floor beneath will be wet too if the moisture made its way all the way through the carpet pad…which it most likely has. Is the floor beneath the carpet concrete? is it plywood? Particleboard? Each will absorb the water at a different rate.
How Wet Is It? (Take Two)
This is such an important part of the equation. If your floor is concrete and you use towels to mop up the water and ring them out in the tub, and you do this right away, the concrete will dry fairly quickly. But if the problem wasn’t discovered for a couple of days, perhaps nobody was home for a week and you come home to discover an inch of water on the concrete floor, even after extracting all of the standing water, the concrete will take much longer to dry. The problem is that the concrete will have absorbed some of the water.
It’s also likely that the drywall in your walls has started to disintegrate and the wall studs have also absorbed water.
These two things, what is wet, and how wet it is, are the things that will let your water technician determine what classification to give to this water loss. That will help them identify the drying techniques to be employed within the overall strategy.
When Will I Know When It Is Done Drying?
On its face, the answer might seem obvious. It is done drying when the material is dry. But, how do you define dry? The reason this matters is that water is part of pretty much everything. Your concrete has water content in it. Your wood has water in it.
To give you an idea, the natural wood moisture content ranges from 8% to about 15%. This is wood that feels dry to the touch, and when you cut it, it’s dry on the inside too. It’s the natural condition of the wood. Between 20% and 30% moisture content, it will start to dry rot. That means that the wood will look and feel dry, but it has enough moisture that fungi can grow and deteriorate the wood beneath the surface. Around 30% it will start to wet rot. The difference being the type of fungi that is growing. At some point above 30% it will get waterlogged. When wood is waterlogged it won’t rot because the fungus is deprived of oxygen. But you can’t live in a house like that (unless your name is Sponge Bob or some such.)
So in this example, we define dry as having the normal amount of moisture content. Not too much and not too little. Regardless of whether it feels dry to the touch or not, it needs to not have more moisture than before the water damage. And we don’t want to over-dry it so that it starts to crack.
When we dry your home we want to make sure that the wood is not only dry to the touch but is dry enough to prevent dry rot.
When talking about dry rot and wet rot we are addressing the fungus that eats away at the wood inside. But we are also very concerned about the fungi that could grow on the surface of the wood. Wood with surface moisture above about 16% will have the moisture levels it needs for the molds that we are accustomed to seeing in a water loss. These are the ones that create health risks. So we have to set a goal for drying the wood so that it has less moisture content than that. The exact level to set is going to depend on the specific wood and the local norms.
Whatever the specific drying goal is, that is determined as part of the drying strategy before starting.
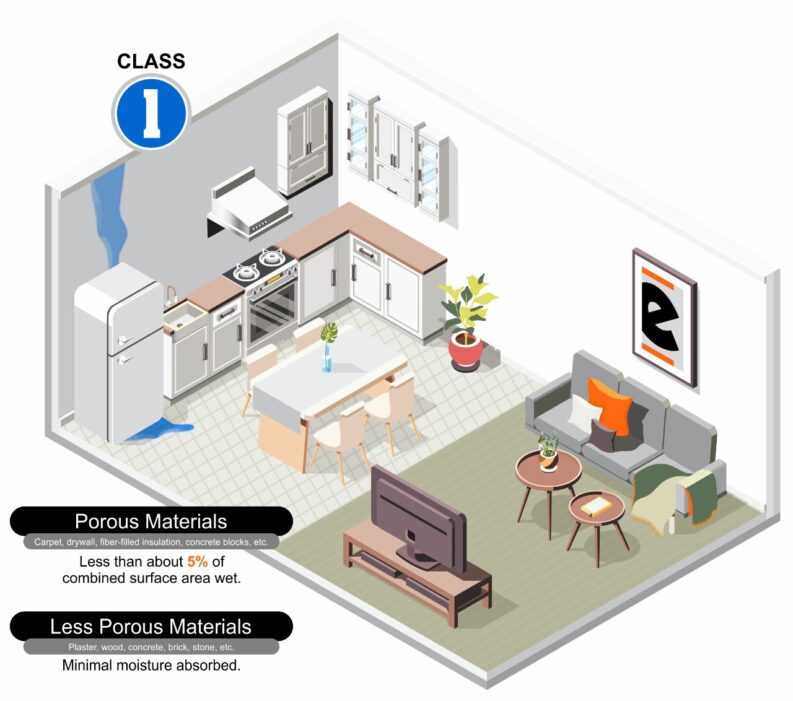
Class 1
A class 1 loss basically describes where the amount of porous materials that are wet is less than about 5% of the affected space. That includes anything that is wet – floors, walls, ceilings – all combined. In this case, we are describing porous materials as things like carpet, drywall, insulation, fabric material.
Or where the materials that are wet are not as porous as those materials described above, but they have minimal absorption. These would include things like concrete, wood, plaster, bricks, etc. Of course, this means that the water couldn’t be present for a long time because even though these are harder surfaces, they are still very capable of absorbing water.
In these cases, there isn’t a lot of water that still needs to evaporate.
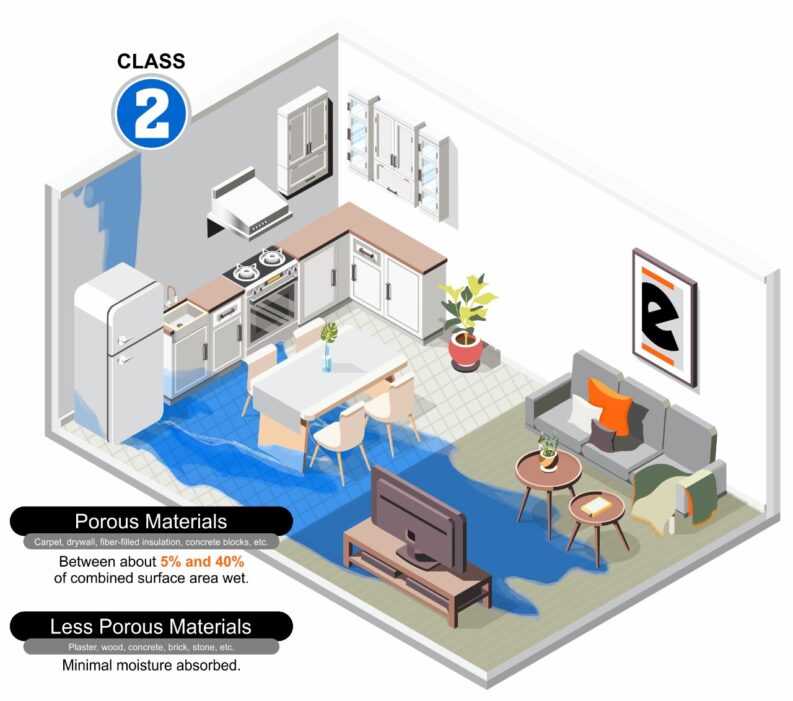
Class 2
In class 2, the same porous materials mentioned above would represent around 5%- 40% of the affected space that is wet. Much more water to extract that in a class 1. But even though there is more water, the less porous materials would still have minimal moisture absorption.
Hypothetical Class 2 Loss
Suppose you just started a program on your favorite streaming service and the opening has loud music and sound effects. There’s lots of action and your attention is wrapped. While this is all happening the water supply to the refrigerator bursts.
Suddenly there is a calm in the show, and it gets quiet. NOW you can hear the water spraying in the kitchen! You jump up to find the kitchen flooded. The water has been spraying on the walls and even reaching the ceiling because of the bounce of the spray. The adjoining rooms have carpet and they are squishy.
Depending on the water pressure of the leak, you could be getting gallons upon gallons of water from a burst pipe each minute. If you catch it early, you can avoid significant absorption.
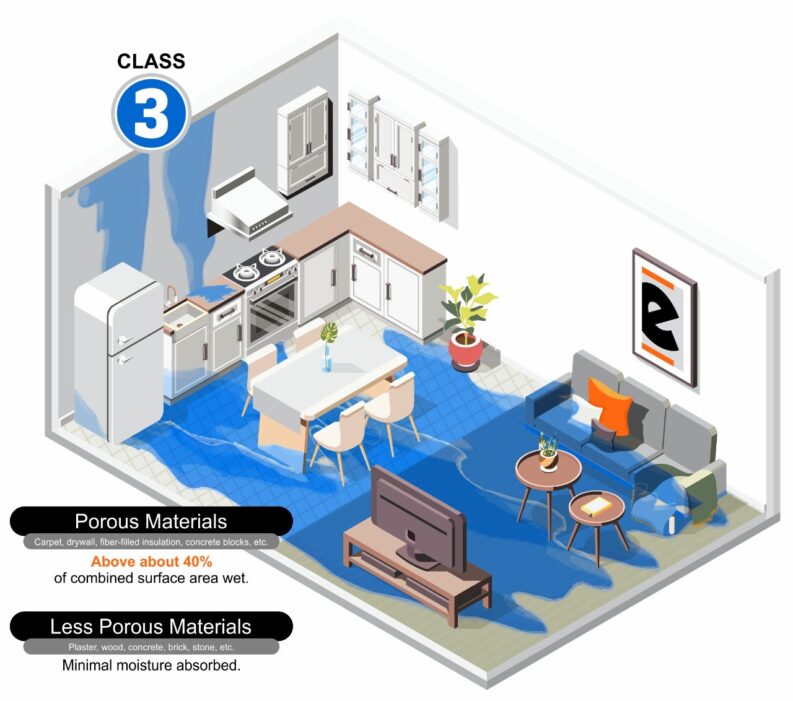
Class 3
In a class 3 loss, you get everything in a class 1 and class 2, but more than 40% of the porous material are affected and wet.
I know, it sounds like a pricing model for an online subscription service. What it really is describing is the amount of water causing the loss and the percentage of the affected area that needs drying.
In all three cases, the IICRC S500 manual says “…and where materials described as low evaporation materials (e.g., plaster, wood, concrete, masonry) or low evaporation assemblies (e.g., multilayer wallboard, multilayer subfloors, gym floors, or other complex, built-up assemblies) have absorbed minimal moisture.” (emphasis added)
Now For a Class 3 Example
Suppose you had a pipe burst in a wall upstairs. It quickly got everything wet inside the wall and while watching TV downstairs you notice water dripping from the ceiling. When you look up you see that the ceiling is bulging. What got your attention was a drip, but the drips are coming faster and faster, starting to form into a near steady stream.
The wall is also wet. You can start to see the seams of the drywall boards because they are all wet and bubbling.
When you pause the movie on your TV you can hear something. Something isn’t right, and well, obviously it’s the sound of the water spraying within your walls. You and your family spring into action. One of you rushing to turn off the water to the house and the other heading upstairs to grab a bunch of towels but also find out what the source of the water is. Someone else runs for the mop and bucket and at least one person is standing around staring not knowing what to do and eventually pulls out their phone to capture it on camera. There’s always one.
Each of these classes, 1, 2, and 3, the drying strategy adjusts to accommodate the specific circumstances, but the general principles applied are the same
Where in some cases you can dry everything and nothing is lost, in other cases, you may have building materials that have been destroyed or because of the category of the loss (as described in part 2 of this series) they have to be removed and disposed of before the drying process begins.
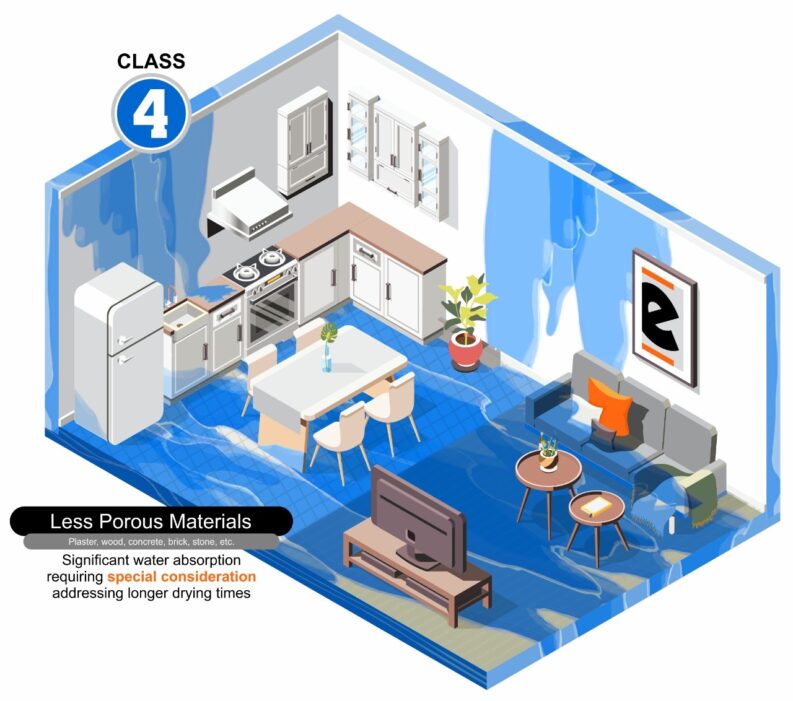
Class 4
In class 4 everything changes. Not only is there a significant amount of water, but there is also a significant amount of absorption by the less porous materials. Suppose you were not home when either of the situations above happened and the burst water pipe was flooding your home for hours or days before it was discovered. Oh my. That’s going to cause a lot of damage. The foundation of the house is going to absorb a lot of water as well as water wicking up the drywall walls and soaking into the wall studs.
This may take special drying methods and will certainly take longer to dry than if these less porous materials hadn’t absorbed a lot of water. It took more time for those materials to absorb the moisture, it’s going to take more time to release it.
Conclusion
The classification is a way to identify the extent of the damage, not just the contamination level, as was the case with the categories of the water loss. It is possible to have a category 1 loss that is a class 3 loss. Or a category 3 loss that is a class 1. Just imagining category 3 / class 4 loss makes me shudder.
The next installment in this series will begin to discuss the equipment the water technicians use to dry out your property and start to make things right again.